Monday, October 9, 2023

EM-Tirupati Codeathon Series #01

[Question]

Algorithms/Data Structures — [Problem Solving]

There is a Specific Need for Changes in a List of Usernames. In a given List of Usernames — For Each Username — If the Username can be Modified and Moved Ahead in a Dictionary. The Allowed Modification is that Alphabets can change Positions in the Given Username.

Example

usernames[] = {“Aab”, “Cat”}

“Aab” cannot be changed to another unique string matching the above rule — Hence, It can Never Find a Place Ahead in the Dictionary. Hence, Output will be “NO”. “Cat” can be Changed to “Act”, “Atc”, “Tca”, “Tac”, “Cta” and Definitely “Act” will Find a Place Before “Cat” in the Dictionary. Hence, Output will be “YES”.

[Function Description]

Complete the function possible Changes in the Editor Below.

Possible Changes has the following parameters:

String usernames[n]: An Array of User Names.

Returns String[n]: An Array with “YES” or “NO” Based on Feasibility

(Actual Question Says String Array, But Signature is List of Strings)

Constraints

• [No Special Constraints Exist, But Cannot Recall Exactly]

[Sample Input]

“The First Line Contains an Integer, n, the Number of Elements in Usernames.”,

“Each Line of the n Subsequent Lines (where 0 < i < n) contains a String usernames[i].”

[Sample Case 0 — Sample Input For Custom Testing]

8

Aab

Cat

Pqrs

Buba

Bapg

Sungi

Lapg

Acba

[Sample Output] (Each Should Be on a Separate Line)

NO YES NO YES YES YES YES YES

Code Explaination:

  1. UsernameValidation is a utility class that encapsulates methods related to username validation and result display.

  2. The possibleChanges method takes a username as input and checks if it can be modified. It compares each character with the characters that follow it and returns true if any character is followed by a smaller character, indicating that the username can be modified.
  3. The displayResults method takes an array of boolean results and displays them as "YES" if the result is true or "NO" if it's false. 
  4. The Question01_Venkata class is the main class that contains the main method and serves as the entry point for the program.
  5. An instance of the UsernameValidation class called validate is created to utilize its validation and display methods. 
  6. Two Scanner objects, scanner and scanner1, are created to read user input.
  7. The user is prompted to input the number of usernames using scanner.nextInt().
  8. Another prompt is displayed, instructing the user to enter string values (usernames).
  9. An array called usernames is created to store the entered usernames.
  10. A boolean array named results is created to store the validation results for each username.
  11. The possibleChanges method from the validate object is called to validate the username and store the result in the results array.
  12. After all usernames are validated, the displayResults method from the validate object is called to display the results.
  13. Results are shown on the console as "YES" if the validation result is true or "NO" if it's false in an Array.
GitHub Repo link:  http://surl.li/mpjte

Source code (Java) :

import java.util.Scanner;

// This class is for username validation and result display

class UsernameValidation {


    // Method to check if the username can be modified

    public static Boolean possibleChanges(String username) {

        for (int i = 0; i < username.length(); i++) {

            char currentChar = username.charAt(i);

            for (int j = i + 1; j < username.length(); j++) {

                char nextChar = username.charAt(j);

                if (nextChar < currentChar) {

                    return true;

                }

            }

        }

        return false;

    }

    // Method to display the results

    public static void displayResults(boolean[] results) {

        System.out.println("Output:");

        for (boolean result : results) {

            System.out.println(result ? "YES" : "NO");

        }

    }

}


public class Question01_Venkata {

    public static void main(String[] args) {

        // Creating an instance of UsernameValidation

        UsernameValidation validate = new UsernameValidation();

        Scanner scanner = new Scanner(System.in);

        System.out.println("Please enter the Size:");

        int size = scanner.nextInt();

        Scanner scanner1 = new Scanner(System.in);

        System.out.println("Please enter the Usernames:");


        // Create an array to store usernames

        String[] usernames = new String[size];

        for (int i = 0; i < size; i++) {

            // Read each username, convert it to lowercase, and store it in the array

            usernames[i] = scanner1.next().toLowerCase();

        }

        // Create an array to store the results

        boolean[] results = new boolean[size];

        // Loop through each username and validate it using the UsernameValidation object

        for (int i = 0; i < size; i++) {

            results[i] = validate.possibleChanges(usernames[i]);

        }

        // Display the results using the displayResults method

        validate.displayResults(results);

    }

}


Thank you

Venkata kishore T(Intern)

Shield Warriors,

Data Shield Team,

Enterprise Minds.


Monday, September 11, 2023

Swagger 3 Annotations In Spring Boot

Introduction:

Swagger 3, also known as OpenAPI 3, is a specification for documenting and defining RESTful APIs. It is the third major version of the Swagger specification, which was originally developed by SmartBear Software and later contributed to the OpenAPI Initiative, a consortium of companies and individuals that work together to standardize and evolve the Swagger/OpenAPI specification.


OpenAPI Specification sets forth a set of guidelines for API development and documentation, encompassing versioning, schema, document structure, and other critical elements, which contributes to creating reliable and consistent APIs.


Swagger provides a range of tools (Swagger Editor, Swagger UI, Swagger Codegen…) to support the development, testing, and documentation of these APIs. So we can think about Swagger 3 as OpenAPI 3 specification implementation.

Swagger 3 vs OpenAPI 3?

  • All Swagger tools, which are supported by SmartBear Software, utilize OpenAPI Specification.
  • But not all OpenAPI tools are Swagger tools. There are many open source and pro tools, which are not related to Swagger, support the OpenAPI 3 Specification.

Swagger 3 annotations

Swagger 3 annotations are already included in springdoc-openapi-ui dependency for Spring Boot 2, or springdoc-openapi-starter-webmvc-ui for Spring Boot 3 with io.swagger.v3.oas.annotations package.

Here are some useful annotations:

      • @Tag
      • @Operation
      • @Parameters and @Parameter
      • @Schema
      • @Hidden or @Parameter(hidden = true) or @Operation(hidden = true)
      • @ApiResponses and @ApiResponse

Swagger 2 to Swagger 3 annotations

Swagger 3 is an updated version of Swagger 2 and has some changes in annotations:

      • @Api → @Tag
      • @ApiIgnore → @Parameter(hidden = true) or @Operation(hidden = true) or @Hidden
      • @ApiImplicitParam → @Parameter
      • @ApiImplicitParams → @Parameters
      • @ApiModel → @Schema
      • @ApiModelProperty(hidden = true) → @Schema(accessMode = READ_ONLY)
      • @ApiModelProperty → @Schema
      • @ApiOperation(value = "foo", notes = "bar") → @Operation(summary = "foo", description = "bar")
      • @ApiParam → @Parameter
      • @ApiResponse(code = 404, message = "foo") → @ApiResponse(responseCode = "404", description = "foo")

Add Swagger 3 into Spring Boot

Spring Boot 3

To use Swagger 3 annotation in Spring Boot 3, you need to add the springdoc-openapi-starter-webmvc-ui dependency to your Maven project’s pom.xml file:

<dependency>
  <groupId>org.springdoc</groupId>
  <artifactId>springdoc-openapi-starter-webmvc-ui</artifactId>
  <version>2.0.3</version>
</dependency>


Or Gradle project with build.gradle file: 

implementation group: 'org.springdoc', name: 'springdoc-openapi-starter-webmvc-ui', version: '2.0.3'


Spring Boot 2

With earlier version of Spring Boot, you can use springdoc-openapi-ui dependency in Maven project’s pom.xml file:

<dependency>
  <groupId>org.springdoc</groupId>
  <artifactId>springdoc-openapi-ui</artifactId>
  <version>1.6.15</version>
</dependency>


Or Gradle project with build.gradle file:

implementation group: 'org.springdoc', name: 'springdoc-openapi-ui', version: '1.6.15'

Swagger 3 annotations example

Rest API

Assume that we have Spring Boot Application that exposes Rest APIs for a Tutorial application in that:

  • Each Tutorial has id, title, description, published status.
  • Apis help to create, retrieve, update, delete Tutorials.
  • Apis also support custom finder methods such as find by published status or by title.

Methods Urls Actions

POST     /api/tutorials                         create new Tutorial

GET     /api/tutorials                         retrieve all Tutorials

GET     /api/tutorials/:id                         retrieve a Tutorial by :id

PUT     /api/tutorials/:id                         update a Tutorial by :id

DELETE     /api/tutorials/:id                         delete a Tutorial by :id

DELETE     /api/tutorials                         delete all Tutorials

GET     /api/tutorials/published         find all published Tutorials

GET     /api/tutorials?title=[keyword] find all Tutorials which title contains keyword

Let’s use Swagger 3 annotations in our Spring Boot app 

Swagger 3 @Tag annotation

In Swagger 3, the @Tag annotation is used to provide additional information about tags in the Swagger documentation. Tags are used to group API operations together and provide a way to categorize and organize them in a meaningful way.

In following example, the @Tag annotation is used to define a tag called “Tutorial” with description: “Tutorial management APIs”. The tag is then applied to the TutorialController class.

@Tag(name = "Tutorial", description = "Tutorial management APIs")
@RestController
@RequestMapping("/api")
public class TutorialController {

  @PostMapping("/tutorials")
  public ResponseEntity<Tutorial> createTutorial(@RequestBody Tutorial tutorial) {

  }

  @GetMapping("/tutorials")
  public ResponseEntity<List<Tutorial>> getAllTutorials(@RequestParam(required = false) String title) {

  }

  @GetMapping("/tutorials/{id}")
  public ResponseEntity<Tutorial> getTutorialById(@PathVariable("id") long id) {

  }

  @PutMapping("/tutorials/{id}")
  public ResponseEntity<Tutorial> updateTutorial(@PathVariable("id") long id, @RequestBody Tutorial tutorial) {

  }

  @DeleteMapping("/tutorials/{id}")
  public ResponseEntity<HttpStatus> deleteTutorial(@PathVariable("id") long id) {
    
  }

  @DeleteMapping("/tutorials")
  public ResponseEntity<HttpStatus> deleteAllTutorials() {
    
  }

  @GetMapping("/tutorials/published")
  public ResponseEntity<List<Tutorial>> findByPublished() {
    
  }
}

When the Swagger documentation is generated, the @Tag annotation will group all of the operations that belong to the “Tutorial” tag together in the documentation. This makes it easy for users to find all of the operations that are related to tutorials.


The @Tag annotation can be added to a method inside a Controller to provide a name and description for the tag. For example:

public class TutorialController {

  @Tag(name = "tutorials", description = "Tutorial APIs")

  @PostMapping("/tutorials")

  public ResponseEntity<Tutorial> createTutorial(@RequestBody Tutorial tutorial) {

  }

                  }


Swagger 3 @Operation annotation

In Swagger 3, the @Operation annotation is used to provide metadata for a single API operation.
Here’s an example of how the @Operation annotation can be used in Spring Boot:

public class TutorialController {

  @Operation(
      summary = "Retrieve a Tutorial by Id",
      description = "Get a Tutorial object by specifying its id. The response is Tutorial object with id, title, description and published status.",
      tags = { "tutorials", "get" })
  @GetMapping("/tutorials/{id}")
  public ResponseEntity<Tutorial> getTutorialById(@PathVariable("id") long id) {

  }
}

In this example, the @Operation annotation provides a summary, description and set tags for the getTutorialById method operation.


Swagger 3 @ApiResponses and @ApiResponse annotation

In Swagger 3, the @ApiResponses annotation can be added to an API operation method to provide a list of possible responses for that operation. Each response is specified using an @ApiResponse annotation.

The @ApiResponse annotation specifies the HTTP status code, description, and content of a response. The content is described using the @Content annotation, which includes the media type and schema of the response body.

 public class TutorialController {

  @ApiResponses({

    @ApiResponse(responseCode = "200", content = { @Content(schema = @Schema(implementation = Tutorial.class), mediaType = "application/json") }),

    @ApiResponse(responseCode = "404", description = "The Tutorial with given Id was not found.", content = { @Content(schema = @Schema()) })

  })

  @GetMapping("/tutorials/{id}")

  public ResponseEntity<Tutorial> getTutorialById(@PathVariable("id") long id) {

  }

}

In this example, the @ApiResponse annotation is used to define two possible responses for the getTutorialById method. The first response (responseCode = "200") indicates a successful response with a JSON representation of the Tutorial object in the response body. The second response (responseCode = "404") indicates that the requested Tutorial Id was not found.


Swagger 3 @Parameter annotation

The @Parameter annotation in Swagger 3 is used to describe a parameter for an operation in an OpenAPI / Swagger document. For example:

public class TutorialController {

  @GetMapping("/tutorials")

  public ResponseEntity<Map<String, Object>> getAllTutorials(

      @Parameter(description = "Search Tutorials by title") @RequestParam(required = false) String title,

      @Parameter(description = "Page number, starting from 0", required = true) @RequestParam(defaultValue = "0") int page,

      @Parameter(description = "Number of items per page", required = true) @RequestParam(defaultValue = "3") int size) {

  }

}

 In the example, the @Parameter annotation describes each of the parameters (title, page, and size) of the getAllTutorials method. The description attribute provides a brief description of each parameter, and the required attribute is set to true to indicate that the parameter is mandatory.

Note that the @Parameter annotation can be used in conjunction with other annotations, such as @RequestParam, @PathVariable, or @RequestBody, depending on the type of parameter being described.

Here is the result:


Or you can use @Parameters annotation to define multiple input parameters for an operation.


public class TutorialController {

  @Parameters({

    @Parameter(name = "title", description = "Search Tutorials by title"),

    @Parameter(name = "page", description = "Page number, starting from 0", required = true),

    @Parameter(name = "size", description = "Number of items per page", required = true)

  })

  @GetMapping("/tutorials")

  public ResponseEntity<Map<String, Object>> getAllTutorials(

      @RequestParam(required = false) String title,

      @RequestParam(defaultValue = "0") int page,

      @RequestParam(defaultValue = "3") int size) {

    return null;

  }

}

Swagger 3 @Schema annotation

In Swagger 3, the @Schema annotation is used in to provide additional information about the schema of a model or parameter in your API.

Let’s use @Schema annotation to define a schema for a Tutorial object.


@Schema(description = "Tutorial Model Information")

public class Tutorial {

  @Schema(accessMode = Schema.AccessMode.READ_ONLY, description = "Tutorial Id", example = "123")

  private long id = 0;

  @Schema(description = "Tutorial's title", example = "Swagger Tutorial")

  private String title;

  @Schema(description = "Tutorial's description", example = "Document REST API with Swagger 3")

  private String description;

  @Schema(description = "Tutorial's status (published or not)", example = "true")

  private boolean published;

  public Tutorial() {

  }

  // getters and setters

}


In the example above, the @Schema annotation provides additional information about the Tutorial class and its fields. The description attribute provides a brief description of what each field represents, while the example attribute provides a sample value for each field.

We use accessMode = Schema.AccessMode.READ_ONLY in the id property. This will mark the id property as readOnly: true in the generated OpenAPI definition.

The Schema with its example value is changed now.


Conclusion

By integrating Swagger Annotations with Spring Boot projects, developers can take advantage of improved performance, scalability and increased productivity through automated documentation generation and simplified versioning capabilities. Moreover by leveraging existing framework features such as caching & streaming capabilities included in the Swagger spec; developers can create complex applications in less time which results in cost savings for businesses as well as happier customers who benefit from better performing applications built on top of frameworks like Spring Boot & Swagger integration.


Thank you

Venkata kishore T(Intern)
Shield Warriors,
Data Shield Team,
Enterprise Minds.

Monday, August 21, 2023

Prompt Engineering: A Step-by-Step Guide to Optimizing Your Work Processes

Prompt engineering is a technique used to optimize and fine-tune language models and other generative AI models for specific tasks and desired outputs. It refers to the process of carefully crafting prompts or inputs for AI models to enhance their performance and accuracy.

A prompt can be as simple as a few words or as complex as an entire paragraph, and it serves as the starting point for an AI model to generate a response. For example, a prompt for a text-to-text model can be a query such as “what is Fermat’s little theorem?”, a command such as “write a poem about leaves falling”, or a short statement of feedback such as “too verbose” or “rephrase again”. A prompt for a text-to-image model can be a description of a desired output such as “a high-quality photo of an astronaut riding a horse”.

Prompt engineering is enabled by in-context learning, which is the ability of large language models(LLM) to temporarily learn from prompts. This means that the model can adapt to different tasks and domains without requiring additional training or fine-tuning. Prompt engineering is also an emergent property of model scale, meaning that larger models are more capable of in-context learning than smaller models.

Prompt engineering is important because it can help improve the quality, relevance, and creativity of the AI model’s responses. It can also help reduce the amount of data and computational resources needed to train and fine-tune the model for each specific task. Prompt engineering can be applied to various domains and tasks, such as language translation, question answering, chatbots, text summarization, text generation, image generation, and more.

How prompt engineering works  

Due to the way the instruction-following models are trained or the data they are trained on, there are specific prompt formats that work particularly well and align better with the tasks at hand. Below we present a number of prompt formats we find work reliably well, but feel free to explore different formats, which may fit your task best.

1. Use the latest model

For best results, we generally recommend using the latest, most capable models. As of November 2022, the best options are the “text-davinci-003” model for text generation, and the “code-davinci-002” model for code generation.

2. Put instructions at the beginning of the prompt and use ### or """ to separate the instruction and context 

Less effective ❌: 

Summarize the text below as a bullet point list of the most important points.

{text input here}

Better ✅:

Summarize the text below as a bullet point list of the most important points.

Text: """ 

{text input here} 

"""

3. Be specific, descriptive and as detailed as possible about the desired context, outcome, length, format, style, etc 

Be specific about the context, outcome, length, format, style, etc 

           Less effective ❌:

            Write a poem about OpenAI. 

Better ✅:

Write a short inspiring poem about OpenAI, focusing on the recent DALL-E product launch (DALL-E is a text to image ML model) in the style of a {famous poet}

 4. Articulate the desired output format through examples (example 1, example 2). 

Less effective ❌: 

Extract the entities mentioned in the text below. Extract the following 4 entity types: company names, people names, specific topics and themes.

Text: {text}

Show, and tell - the models respond better when shown specific format requirements. This also makes it easier to programmatically parse out multiple outputs reliably.

          Better ✅:

Extract the important entities mentioned in the text below. First extract all company names, then extract all people names, then extract specific topics which fit the content and finally extract general overarching themes

Desired format:

Company names: <comma_separated_list_of_company_names> 

People names: -||- 

Specific topics: -||- 

General themes: -||-

          Text: {text}


5. Start with zero-shot, then few-shot (example), neither of them worked, then fine-tune 

✅ Zero-shot  

Extract keywords from the below text.

          Text: {text}

Keywords:

✅ Few-shot - provide a couple of examples 

Extract keywords from the corresponding texts below.

Text 1: Stripe provides APIs that web developers can use to integrate payment processing into their websites and mobile applications.

Keywords 1: Stripe, payment processing, APIs, web developers, websites, mobile applications## 

Text 2: OpenAI has trained cutting-edge language models that are very good at understanding and generating text. Our API provides access to these models and can be used to solve virtually any task that involves processing language. 

Keywords 2: OpenAI, language models, text processing, API. 

## 

Text 3: {text}

           Keywords 3:
          ✅Fine-tune: see fine-tune best practices here.

6. Reduce “fluffy” and imprecise descriptions

Less effective ❌:

          The description for this product should be fairly short, a few sentences only, and not too much more.

Better ✅:

Use a 3 to 5 sentence paragraph to describe this product.  

 7. Instead of just saying what not to do, say what to do instead

Less effective ❌: 

The following is a conversation between an Agent and a Customer. DO NOT ASK USERNAME OR PASSWORD. DO NOT REPEAT.

Customer: I can’t log in to my account.

Agent:

          Better ✅:

The following is a conversation between an Agent and a Customer. The agent will attempt to diagnose the problem and suggest a solution, whilst refraining from asking any questions related to PII. Instead of asking for PII, such as username or password, refer the user to the help article www.samplewebsite.com/help/faq

Customer: I can’t log in to my account.

Agent:

8. Code Generation Specific - Use “leading words” to nudge the model toward a particular pattern

Less effective ❌: 

# Write a simple python function that

# 1. Ask me for a number in mile 

# 2. It converts miles to kilometers

In this code example below, adding “import” hints to the model that it should start writing in Python. (Similarly “SELECT” is a good hint for the start of a SQL statement.) 

Better ✅:

# Write a simple python function that

# 1. Ask me for a number in mile

# 2. It converts miles to kilometers

 import

Tips to enhance your prompt-engineering abilities 

Tip #1: Know the model’s strengths and weaknesses:

As AI models evolve and become more complex, it is essential for developers to comprehend their capabilities and limitations. Understanding these strengths and weaknesses can help you, as a developer, avoid making mistakes and create safer, more reliable applications.

Tip #2: Be as specific as possible:

AI models have the ability to comprehend a variety of prompts. For instance Google’s PaLM 2 can understand natural language prompts, multilingual text, and even programming codes like Python and JavaScript. Although AI models can be very knowledgeable, they are still imperfect, and have the ability to misinterpret prompts that are not specific enough. In order for AI models to navigate ambiguity, it is important to tailor your prompts specifically to your desired outcome. 

Tip #3: Utilize contextual prompts:

Utilize contextual information in your prompts to help the model gain an in-depth understanding of your requests. Contextual prompts can include the specific task you want the model to perform, a replica of the output you're looking for, or a persona to emulate, from a marketer or engineer to a high school teacher. Defining a tone and perspective for an AI model gives it a blueprint of the tone, style, and focused expertise you’re looking for to improve the quality, relevance, and effectiveness of your output.

Tip #4: Provide AI models with examples :

When creating prompts for AI models, it is helpful to provide examples. This is because prompts act as instructions for the model, and examples can help the model to understand what you are asking for. Providing a prompt with an example looks something like this: “here are several recipes I like – create a new recipe based on the ones I provided.” The model can now understand the your ability and needs in order to make this pastry,

Tip #5: Experiment with prompts and personas:

The way you construct your prompt impacts the model’s output. By creatively exploring different requests, you will soon have an understanding of how the model weighs its answers, and what happens when you interfuse your domain knowledge, expertise, and lived experience with the power of a multi-billion parameter large language model. 

Try experimenting with different keywords, sentence structures, and prompt lengths to discover the perfect formula. Allow yourself to step into the shoes of various personas, from work personas such as “product engineer” or “customer service representatives,” to parental figures or celebrities such as your grandmother, a celebrity chef, and explore everything from cooking to coding!

By crafting unique, and innovative, requests replete with your expertise and experience, you can learn which prompts provide you with your ideal output. Further refining your prompts, known as ‘tuning,’ allows the model to have a greater understanding and framework for your next output.

Tip #6: Try chain-of-thought prompting:

Chain of thought prompting is a technique for improving the reasoning capabilities of large language models (LLMs). It works by breaking down a complex problem into smaller steps, and then prompting the LLM to provide intermediate reasoning for each step. This helps the LLM to understand the problem more deeply, and to generate more accurate and informative answers. This will help you to understand the answer better and to make sure that the LLM is actually understanding the problem.

Conclusion
Prompt engineering is a skill that all workers, across industries and organizations, will need as AI-powered tools are becoming more prevalent. Remember to incorporate these five essential tips the next time you communicate with an AI model, so you can generate the accurate outputs that you desire. AI will forever continue to develop, constantly refining itself as we use it, so I encourage you to remember that learning, for mind and machine, is a never ending journey. Happy Prompting!

Thank you

Venkata kishore T(Intern)
Shield Warriors,
Data Shield Team,
Enterprise Minds.

Thursday, July 20, 2023

Cucumber - Gherkins

Introduction:

Before proceeding with this tutorial, you need to have a basic knowledge on testing as well as some hands-on experience of some testing tools. You should have a commanding knowledge on Java, and some familiarity with JUnit and Ruby.

In order to get better advantage of the software testing, organizations are nowadays taking a step forward. They implement important acceptance test scenarios while development is in-progress. This approach is commonly known as Behavior Driven Development (BDD).

What is BDD?

  Behavior-Driven Development (BDD) is a development method that encourages communication between teams. This collaborative approach brings the business and the technical aspects of projects together. This method allows teams to better communicate on requirements, detect problems early on, and maintain software over time with ease.

Teams that use BDD have a couple of goals. The first is to make sure that the requirements can be understood by the entire team. Then the teams can focus on preventing possible issues, rather than putting out fires if they’re found later. Often this means that less re-working is required. 

Behavior Driven Development gives us an opportunity to create test scripts from both the developer’s and the customer’s perspective as well. So in the beginning, developers, project managers, QAs, user acceptance testers and the product owner (stockholder), all get together and brainstorm about which test scenarios should be passed in order to call this software/application successful. This way they come up with a set of test scenarios. All these test scripts are in simple English language, so it serves the purpose of documentation also.

Simply we can describe this development in two phases. Discovery and testing.  

  1. First, teams figure out what they don’t know BEFORE they start working. Then, they have a better understanding of how to stay on track and be more productive. 
  2. When it comes to testing, the process of thinking about these tests starts before development even begins. Tests are written to drive the implementation and the final product.

Example

If we are developing a user authentication feature, then the following can be few key test scenarios, which needs to get passed in order to call it a success.

  • The user should be able to login with correct username and correct password.
  • The user should not be able to login with incorrect username and correct password.
  • The user should not be able to login with correct username and incorrect password.


What is Cucumber?

Cucumber is a popular open-source tool and framework that supports BDD practices. It allows you to write executable specifications in a human-readable format using the Gherkin language. Cucumber enables collaboration among team members and provides a way to automate and execute those specifications as tests. It supports various programming languages, including Java, Ruby, JavaScript, and more, allowing teams to implement step definitions in their preferred language.

Advantages of Cucumber Over Other Tools

  • Cucumber supports different languages like Java.net and Ruby.
  • It acts as a bridge between the business and technical language. We can accomplish this by creating a test case in plain English text.
  • It allows the test script to be written without knowledge of any code, it allows the involvement of non-programmers as well.
  • It serves the purpose of end-to-end test framework unlike other tools.
  • Due to simple test script architecture, Cucumber provides code reusability.

Prerequisites for Environment Setup

Following are the prerequisites required to set up with − Java

Why we need − Java is a robust programming language. Cucumber supports Java platform for the execution.

How to install −

Step 1 − Download jdk and jre from the following link http://www.oracle.com/technetwork/java/javase/downloads/index.html

Step 2 − Accept license agreement.

Step 3 − Install JDK and JRE.

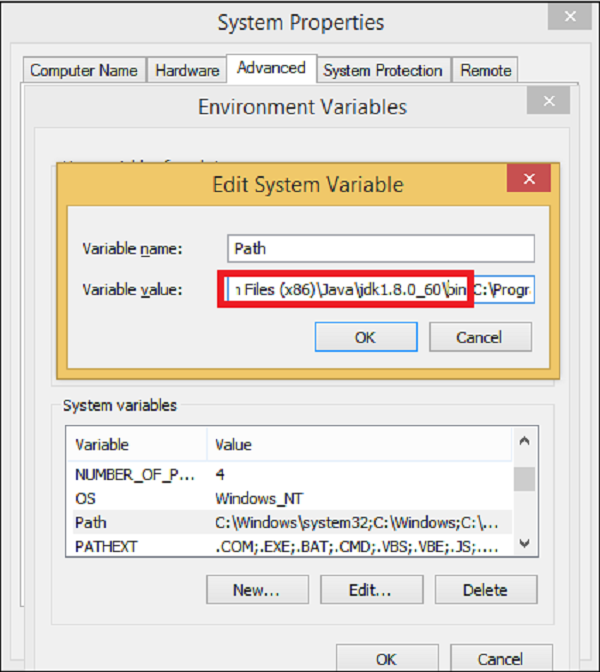
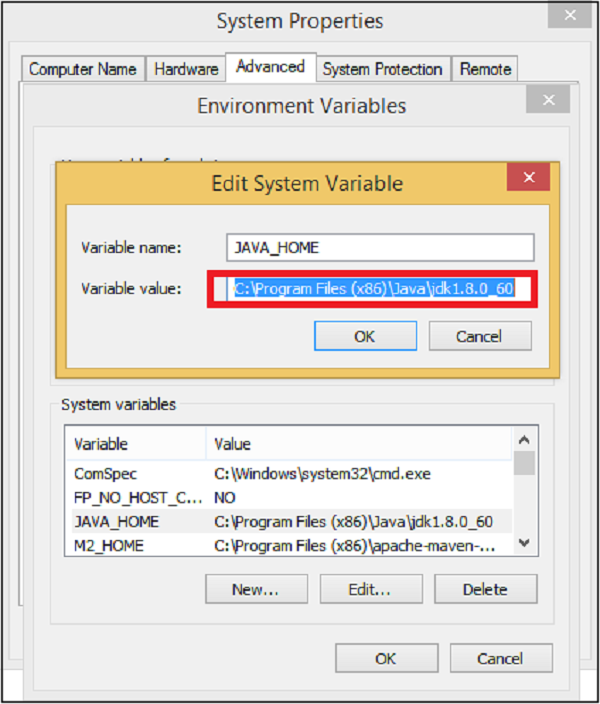
Step 4 − Set the environment variable as shown in the following screenshots.
System PropertiesEdit System Variable

Eclipse
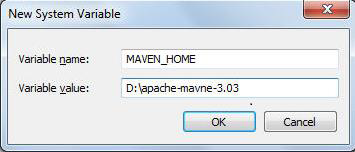
Maven
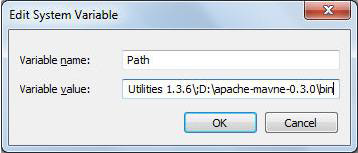
System VariablesEdit Path Variable
Configure Cucumber with Maven
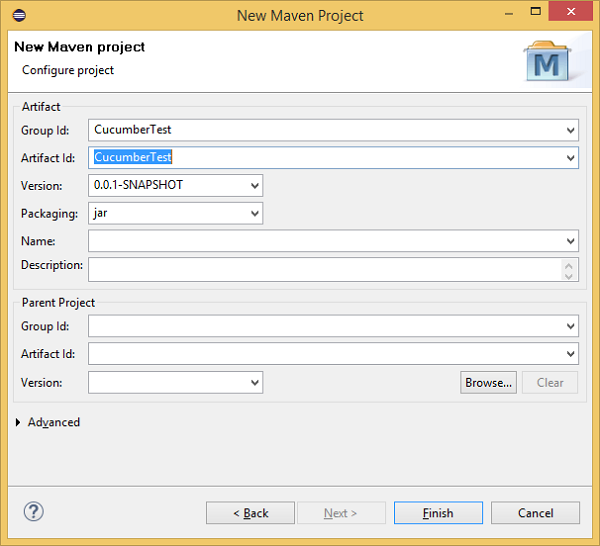
New Maven Project
<dependency>
<groupId>org.seleniumhq.selenium</groupId>
<artifactId>selenium-java</artifactId>
<version>2.47.1</version>
</dependency>
<dependency>
<groupId>info.cukes</groupId>
<artifactId>cucumber-java</artifactId>
<version>1.0.2</version>
<scope>test</scope>
</dependency>
<dependency>
<groupId>info.cukes</groupId>
<artifactId>cucumber-junit</artifactId>
<version>1.0.2</version>
<scope>test</scope>
</dependency>
<dependency>
<groupId>junit</groupId>
<artifactId>junit</artifactId>
<version>4.10</version>
<scope>test</scope>
</dependency>
Package Explorer

Why we need − Eclipse is an Integrated Development Environment (IDE). It contains a base workspace and an extensible plug-in system for customizing the environment.

How to install −

Step 1 − Make sure JAVA is installed on your machine.

Step 2 − Download Eclipse from https://eclipse.org/downloads/

Step 3 − Unzip and Eclipse is installed.

Why we need − Maven is a build automation tool used primarily for Java projects. It provides a common platform to perform activities like generating source code, compiling code, packaging code to a jar, etc. Later if any of the software versions gets changed, Maven provides an easy way to modify the test project accordingly.

How to install −

Step 1 − Download Maven from the following link − https://maven.apache.org/download.cgi

Step 2 − Unzip the file and remember the location.

Step 3 − Create environment variable MAVEN_HOME as shown in the following screenshot.

Step 4 − Edit Path variable and include Maven as shown in the following screenshot.

Step 5 − Download MAVEN plugin from Eclipse.

Step 6 − Open Eclipse.

Step 7 − Go to Help → Eclipse Marketplace → Search Maven → Maven Integration for Eclipse → INSTALL.

Step 1 − Create a Maven project.

  • Go to File → New → Others → Maven → Maven Project → Next.

  • Provide group Id (group Id will identify your project uniquely across all projects).

  • Provide artifact Id (artifact Id is the name of the jar without version. You can choose any name, which is in lowercase). Click on Finish.

Step 2 − Open pom.xml.

  • Go to package explorer on the left hand side of Eclipse.

  • Expand the project CucumberTest.

  • Locate pom.xml file.

  • Right-click and select the option, open with “Text Editor”.

Step 3 − Add dependency for selenium: This will indicate Maven which Selenium jar files are to be downloaded from the central repository to the local repository.

  • Open pom.xml is in the edit mode, create dependencies tag (<dependencies></dependencies>), inside the project tag.

  • Inside the dependencies tag, create dependency tag (<dependency></dependency>).

  • Provide the following information within the dependency tag.

Step 4 − Add dependency for Cucumber-Java: This will indicate Maven, which Cucumber files are to be downloaded from the central repository to the local repository.

  • Create one more dependency tag.

  • Provide the following information within the dependency tag

Step 5 − Add dependency for Cucumber-JUnit: This will indicate Maven, which Cucumber JUnit files are to be downloaded from the central repository to the local repository.

  • Create one more dependency tag.

  • Provide the following information within the dependency tag

Step 6 − Add dependency for JUnit: This will indicate Maven, which JUnit files are to be downloaded from the central repository to the local repository.

  • Create one more dependency tag.

  • Provide the following information within the dependency tag.

Step 7 − Verify binaries.

  • Once pom.xml is edited successfully, save it.

  • Go to Project → Clean − It will take a few minutes.

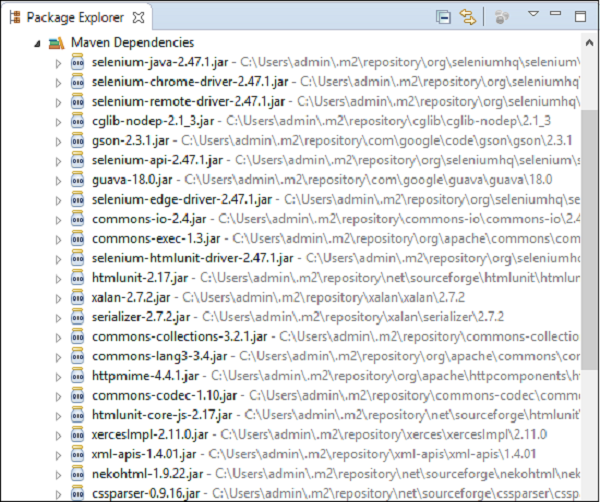
You will be able to see a Maven repository like shown in the following screenshot.

  • Create a feature file (to be covered later).

  • Create a step definition file (to be covered later).

  • Create a JUnit runner to run the test (to be covered later).

What is Gherkin?

Gherkin is a domain-specific language (DSL) that is used to describe the behavior of a software system in a structured and readable manner. It serves as the syntax for writing BDD-style acceptance criteria and test scenarios. Gherkin uses a simple, keyword-driven syntax that makes it accessible to non-technical stakeholders. It is designed to be easily understandable by both technical and non-technical team members, fostering effective collaboration.

Gherkin follows a structured format with keywords such as Feature, Scenario, Given, When, Then, And, and But. It allows you to define features, scenarios, and their associated steps in a hierarchical and reusable manner. Gherkin files, written in the Gherkin language, are used as a common language for communication and documentation between business stakeholders, developers, and testers.

Feature

A Feature can be defined as a standalone unit or functionality of a project. Let’s take a very common example of a social networking site. How does the feature of this product/project look like? Few basic features can be determined as −

    • Create and remove the user from the social networking site.
    • User login functionality for the social networking site.
    • Sharing photos or videos on the social networking site.
    • Sending a friend request.
    • Logout.
Example
Feature − Login functionality for a social networking site.
The user should be able to login into the social networking site if the username and the password are correct.
    • Feature − Name of the feature under test.
    • Description (optional) − Describe about feature under test.
    • Scenario − What is the test scenario.
    • Given − Prerequisite before the test steps get executed.
    • When − Specific condition which should match in order to execute the next step.
    • Then − What should happen if the condition mentioned in WHEN is satisfied.

By now, it is clear that, each independent functionality of the product under test can be termed as a feature when we talk about Cucumber. It is a best practice later when you start testing, that before deriving the test scripts, we should determine the features to be tested.

A feature usually contains a list of scenarios to be tested for that feature. A file in which we store features, description about the features and scenarios to be tested is known as Feature File. We will see more about feature files in the following chapter.

The keyword to represent a feature under test in Gherkins is “Feature”. The suggested best practice is, to write a small description of the feature beneath the feature title in the feature file. This will fulfill the need of a good documentation as well.

The user should be shown the error message if the username and the password are incorrect.

The user should be navigated to home page, if the username and password are correct.

Feature Files

The file, in which Cucumber tests are written, is known as feature files. It is advisable that there should be a separate feature file, for each feature under test. The extension of the feature file needs to be “.feature”.

One can create as many feature files as needed. To have an organized structure, each feature should have one feature file.

For Example −

Sr.No   Feature                Feature File name

  1         User Login         userLogin.feature

  2         Share the Post         sharePost.feature

  3         Create Account createAccount.feature

  4         Delete Account deleteAccount.feature

The naming convention to be used for feature name, feature file name depends on the individual’s choice. There is no ground rule in Cucumber about names.

A simple feature file consists of the following keywords/parts −

Example

Feature − User login on social networking site.

The user should be able to login into the social networking site when the username and the password are correct.

The user should be shown an error message when the username and the password are incorrect.

The user should be navigated to the home page if the username and the password are correct.

Outline − Login functionality for a social networking site.

The given user navigates to Facebook. When I enter Username as "<username>" and Password as "<password>". Then, login should be unsuccessful.

                                        | username  | password  |

                                        | username1 | password1 |

* AND keyword is used to show conjunction between two conditions. AND can be used with any other keywords like GIVEN, WHEN and THEN.

There are no logic details written in the feature file.

Steps Definitions

We have got our feature file ready with the test scenarios defined. However, this is not the complete job done. Cucumber doesn’t really know which piece of code is to be executed for any specific scenario outlined in a feature file.

This calls the need of an intermediate – Step Definition file. Steps definition file stores the mapping between each step of the scenario defined in the feature file with a code of function to be executed.

So, now when Cucumber executes a step of the scenario mentioned in the feature file, it scans the step definition file and figures out which function is to be called.

Example of Step Definition File

public void goToFacebook() { 
   driver = new FirefoxDriver(); 
   driver.navigate().to("https://www.facebook.com/"); 
} 
@When "^user logs in using Username as \"([^\"]*)\" and Password as \"([^\"]*)\"$"
public void I_enter_Username_as_and_Password_as(String arg1, String arg2) {
   driver.findElement(By.id("email")).sendKeys(arg1);
   driver.findElement(By.id("pass")).sendKeys(arg2);
   driver.findElement(By.id("u_0_v")).click(); 
} 
@Then"^login should be unsuccessful$" 
public void validateRelogin() { 
   if(driver.getCurrentUrl().equalsIgnoreCase(
      "https://www.facebook.com/login.php?login_attempt=1&lwv=110")){ 
         System.out.println("Test Pass");
   } else { 
      System.out.println("Test Failed"); 
   } 
   driver.close(); 

}


So with each function, whatever code you want to execute with each test step (i.e. GIVEN/THEN/WHEN), you can write it within Step Definition file. Make sure that code/function has been defined for each of the steps.

This function can be Java functions, where we can use both Java and Selenium commands in order to automate our test steps.

Scenario

Scenario is one of the core Gherkin structures. Every scenario starts with the keyword “Scenario:” (or localized one) and is followed by an optional scenario title. Each feature can have one or more scenarios and every scenario consists of one or more steps. A very simple example of scenario can be −

Scenario − Verify Help Functionality.

Given user navigates to Facebook.

When the user clicks on Help, then the Help page opens.

Consider a case, where we need to execute a test scenario more than once. Suppose, we need to make sure that the login functionality is working for all types of subscription holders. That requires execution of login functionality scenario multiple times. Copy paste the same steps in order to just re-execute the code, does not seem to be a smart idea. For this, Gherkin provides one more structure, which is scenario outline.

Scenario outline is similar to scenario structure; the only difference is the provision of multiple inputs. As you can see in the following example, the test case remains the same and non-repeatable. At the bottom we have provided multiple input values for the variables “Username” and “Password”. While running the actual test, Cucumber will replace the variable with input values provided and it will execute the test. Once pass-1 has been executed, the test will rerun for second iteration with another input value. Such variable or placeholders can be represented with ”<>” while mentioning with gherkin statements.

Example
| username | password |
| user1 | password1 |
| user2 | password2 |

  • Given the user enters the user name.
  • Clicks on login.

Scenario Outline − Login functionality for a social networking site. The given user navigates to Facebook.

When the user logs in using the Username as "<username>" and the Password as "<password>", then login should be successful.

There are a few tips and tricks to smartly define the Cucumber scenarios.

  1. Each step should be clearly defined, so that it does not create any confusion for the reader.
  2. Do not repeat the test scenario, if needed use scenario outline to implement repetition.
  3. Develop a test step in a way that, it can be used within multiple scenarios and scenario outlines.
  4. As far as possible, keep each step completely independent. For example: “Given the user is logged in”. This can be divided into two steps              

  • Given the user enters the user name.
  • Clicks on login.

Annotation:

It is a predefined text, which holds a specific meaning. It lets the compiler/interpreter know, what should be done upon execution. Cucumber has got the following few annotations −

  • Given −

      • It describes the pre-requisite for the test to be executed.
      • Example − GIVEN I am a Facebook user
  • When −

      • It defines the trigger point for any test scenario execution.
      • Example − WHEN I enter "<username>"
  • Then −

      • Then holds the expected result for the test to be executed.
      • Example − THEN login should be successful.
  • And −

      • It provides the logical AND condition between any two statements. AND can be used in conjunction with GIVEN, WHEN and THEN statement.
      • Example − WHEN I enter my "<username>" AND I enter my "<password>"
  • But −

      • It signifies logical OR condition between any two statements. OR can be used in conjunction with GIVEN, WHEN and THEN statement.
      • Example − THEN login should be successful. BUT home page should not be missing.
  • Scenario −

    • Details about the scenario under the test needs to be captured after the keyword “Scenario:”
    • Example −

Scenario:

GIVEN I am a Facebook user

WHEN I enter my

AND I enter my

THEN login should be successful.

BUT home page should not be missing.

  • Scenario Outline − (To be covered later)

  • Examples − (To be covered later)

  • Background −

    • Background generally has the instruction on what to setup before each scenario runs. However, it gets executed after “Before” hook (to be covered later). So this is ideal to be used for code when we want to set up the web-browser or we want to establish the database connectivity.

    • Example −

Background:

Go to Facebook home page.

Example Scenario

Let’s automate a scenario in order to understand annotations better.

Step 1

Create a Maven Test Project named as AnnotationTest.

  • Go to File → New → Others → Maven → Maven Project → Next.
  • Provide group Id (group Id will identify your project uniquely across all projects).
  • Provide artifact Id (artifact Id is the name of the jar without version. You can choose any name which is in lowercase).
  • Click on Finish.
  • Open pom.xml −
    • Go to package explorer on the left hand side of Eclipse.
    • Expand the project AnnotationTest.
    • Locate pom.xml file.
    • Right-click and select the option, Open with “Text Editor”.
  • Add dependency for Selenium − This will indicate Maven, which Selenium jar files are to be downloaded from the central repository to the local repository.

    • Open pom.xml is in edit mode, create dependencies tag (<dependencies></dependencies>), inside the project tag.
    • Inside the dependencies tag, create dependency tag (<dependency></dependency>).
    • Provide the following information within the dependency tag.

<dependency>
<groupId>org.seleniumhq.selenium</groupId>
<artifactId>selenium-java</artifactId>
<version>2.47.1</version>
</dependency>
  • Add dependency for Cucumber-Java − This will indicate Maven, which Cucumber files are to be downloaded from the central repository to the local repository.

    • Create one more dependency tag.
    • Provide following information within the dependency tag.

<dependency>
<groupId>info.cukes</groupId>
<artifactId>cucumber-java</artifactId>
<version>1.0.2</version>
<scope>test</scope>
</dependency>
  • Add dependency for Cucumber-JUnit − This will indicate Maven, which Cucumber JUnit files are to be downloaded from the central repository to the local repository.

    • Create one more dependency tag.
    • Provide the following information within the dependency tag.

<dependency>
<groupId>info.cukes</groupId>
<artifactId>cucumber-junit</artifactId>
<version>1.0.2</version>
<scope>test</scope>
</dependency>
  • Add dependency for JUnit − This will indicate Maven, which JUnit files are to be downloaded from the central repository to the local repository.

    • Create one more dependency tag.
    • Provide the following information within the dependency tag.

<dependency>
<groupId>junit</groupId>
<artifactId>junit</artifactId>
<version>4.10</version>
<scope>test</scope>
</dependency>
  • Verify binaries.

    • Once pom.xml is edited successfully, save it.
    • Go to Project → Clean − It will take a few minutes.

Step 2

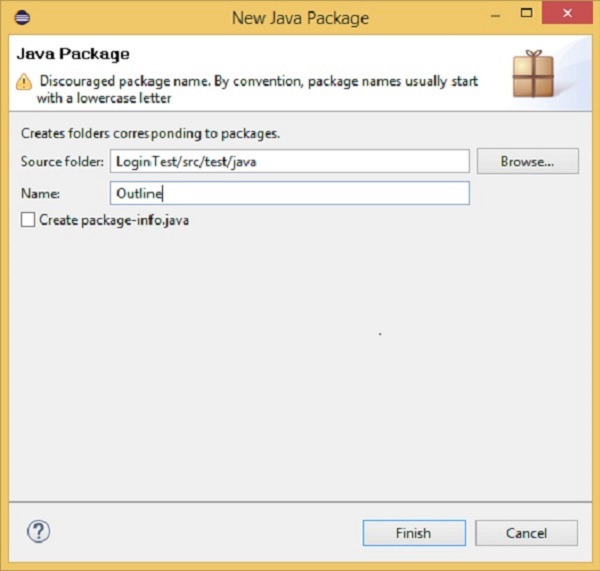
Create a package named Annotation under src/test/java

    • Select the newly created project.
    • Right-click and select ‘New’.
    • Select option as ‘Package’.
    • Name it as ‘Annotation’.
    • Save it.

Step 3

Create a feature file named annotation.feature.

    • Select and right-click on the package outline.
    • Click on ‘New’ file.
    • Give the file a name such as outline.feature.
    • Write the following text within the file and save it.

Feature: annotation
#This is how background can be used to eliminate duplicate steps

Background: User navigates to Facebook Given I am on Facebook login page #Scenario with AND Scenario: When I enter username as "TOM" And I enter password as "JERRY" Then Login should fail #Scenario with BUT Scenario: When I enter username as "TOM" And I enter password as "JERRY" Then Login should fail
But Relogin option should be available

Step 4

Create a step definition file.

    • Select and right-click on the package outline.
    • Click on ‘New’ file.
    • Give the file name as annotation.java
    • Write the following text within the file and save it.

package Annotation;

import org.openqa.selenium.By;
import org.openqa.selenium.WebDriver;
import org.openqa.selenium.firefox.FirefoxDriver;

import cucumber.annotation.en.Given;
import cucumber.annotation.en.Then;
import cucumber.annotation.en.When;

public class annotation {
WebDriver driver = null;
@Given("^I am on Facebook login page$")
public void goToFacebook() {
driver = new FirefoxDriver();
driver.navigate().to("https://www.facebook.com/");
}
@When("^I enter username as \"(.*)\"$")
public void enterUsername(String arg1) {
driver.findElement(By.id("email")).sendKeys(arg1);
}
@When ("^I enter password as \"(.*)\"$")
public void enterPassword(String arg1) {
driver.findElement(By.id("pass")).sendKeys(arg1);
driver.findElement(By.id("u_0_v")).click();
}
@Then("^Login should fail$")
public void checkFail() {
if(driver.getCurrentUrl().equalsIgnoreCase(
"https://www.facebook.com/login.php?login_attempt=1&lwv=110")){
System.out.println("Test1 Pass");
} else {
System.out.println("Test1 Failed");
}
driver.close();
}
@Then("^Relogin option should be available$")
public void checkRelogin() {
if(driver.getCurrentUrl().equalsIgnoreCase(
"https://www.facebook.com/login.php?login_attempt=1&lwv=110")){
System.out.println("Test2 Pass");
} else {
System.out.println("Test2 Failed");
}
driver.close();
}
}

Step 5

Create a runner class file.

    • Select and right-click on the package outline.
    • Click on ‘New’ file.
    • Give the file a name, such as runTest.java
    • Write the following text within the file and save it.

package Annotation;

import org.junit.runner.RunWith;
import cucumber.junit.Cucumber;

@RunWith(Cucumber.class)
@Cucumber.Options(format = {"pretty", "html:target/cucumber"})

public class runTest { }

Step 6

Run the test using option −

    • Select runTest.java file from the package explorer.
    • Right-click and select the option ‘Run as’
    • Select JUnit test.

You will observe the following things when you run this class file −

    • Facebook opens in a new Firefox web-browser instance.
    • TOM will be passed as an input to the username field.
    • JERRY will be passed as an input to the password field.
    • Login will be clicked.
    • Message will be displayed on the browser regarding unsuccessful login.
    • In the console, you will see “Test Pass” printed
    • Step result 1. to 5. Will be re-executed for username as "" and password as "".

Scenario outline: It is basically replaces variable/keywords with the value from the table. Each row in the table is considered to be a scenario.

Let’s continue with the same example of Facebook login feature. So far we have been executing one scenario: Upon providing the correct user name, login is successful. Now, suppose we want to check if login is successful for all three possible types of inputs, which are username, email address, or phone number. To achieve this, we will need to write three different scenarios, where each scenario will vary with the type of input, login is successful. In this case, scenarios will look like the following.

Scenario:

Given user navigates to Facebook

When I enter correct username and password

Then login should be successful

Scenario:

Given user navigates to Facebook

When I enter correct email address and password

Then login should be successful

Scenario:

Given user navigates to Facebook

When I enter correct phone number and password

Then login should be successful

Here, if we see closely, for above three scenarios: statements are the same, only the input parameter (username/email address/phone number) is changing. That’s where the importance of scenario outline comes into picture.

When we define any scenario with scenario outline, we can specify one test scenario and at the bottom of it we can provide a number of inputs. The scenario will get executed as many times as the number of inputs provided.

Example

Let’s create an example of a scenario outline −

Step 1 − Create a Maven Test Project named as ScenarioOutlineTest

  • Go to File → New → Others → Maven → Maven Project → Next.
  • Provide group Id (group Id will identify your project uniquely across all projects).
  • Provide artifact Id (artifact Id is the name of the jar without version. You can choose any name which is in lowercase).
  • Click on Finish.
  • Open pom.xml −
    • Go to package explorer on the left hand side of Eclipse.
    • Expand the project CucumberTest.
    • Locate pom.xml file.
    • Right-click and select the option, Open with “Text Editor”.
  • Add dependency for Selenium − This will indicate Maven, which Selenium jar files are to be downloaded from the central repository to the local repository.

    • Open pom.xml is in edit mode, create dependencies tag (<dependencies></dependencies>), inside the project tag.
    • Inside the dependencies tag, create dependency tag (<dependency></dependency>).
    • Provide the following information within the dependency tag.

<dependency>
<groupId>org.seleniumhq.selenium</groupId>
<artifactId>selenium-java</artifactId>
<version>2.47.1</version>
</dependency>
  • Add dependency for Cucumber-Java: This will indicate Maven, which Cucumber files are to be downloaded from the central repository to the local repository.

    • Create one more dependency tag.
    • Provide following information within the dependency tag.

<dependency>
<groupId>info.cukes</groupId>
<artifactId>cucumber-java</artifactId>
<version>1.0.2</version>
<scope>test</scope>
</dependency>
  • Add dependency for Cucumber-JUnit: This will indicate Maven, which Cucumber JUnit files are to be downloaded from the central repository to the local repository.

    • Create one more dependency tag.
    • Provide the following information within the dependency tag.

<dependency>
<groupId>info.cukes</groupId>
<artifactId>cucumber-junit</artifactId>
<version>1.0.2</version>
<scope>test</scope>
</dependency>
  • Add dependency for JUnit - This will indicate Maven, which JUnit files are to be downloaded from the central repository to the local repository.

    • Create one more dependency tag.
    • Provide the following information within the dependency tag.

<dependency>
<groupId>junit</groupId>
<artifactId>junit</artifactId>
<version>4.10</version>
<scope>test</scope>
</dependency>
  • Verify binaries.

    • Once pom.xml is edited successfully, save it.
    • Go to Project → Clean − It will take a few minutes.

Step 2 − Create a package named “outline” under src/test/java
Java Package

Step 3 − Create a feature file named “outline.feature”

  • Select and right-click on the package outline.
  • Click on ‘New’ file.
  • Give the file name such as “outline.feature”
    • Write the following text within the file and save it.

Feature − Scenario Outline

Scenario Outline − Login functionality for a social networking site.

Given user navigates to Facebook

When I enter Username as "<username>" and Password as "<password>"

Then login should be unsuccessful

Example −

| username | password |
| username1 | password1 |
| username2 | password2 |

Note − Here, example annotation describes the range of input to be provided upon scenario execution. Test scenario will be executed for each of the input provided. So, in the given example, test scenario will be executed three times.

Step 4 − Create a step definition file.

  • Select and right-click on the package outline.
  • Click on ‘New’ file.
  • Give the file name as stepdefinition.java
  • Write the following text within the file and save it.

package Outline;
import org.openqa.selenium.By;
import org.openqa.selenium.WebDriver;
import org.openqa.selenium.firefox.FirefoxDriver;

import cucumber.annotation.en.Given;
import cucumber.annotation.en.Then;
import cucumber.annotation.en.When;

public class stepdefinition {
WebDriver driver = null;
@Given("^user navigates to facebook$")
public void goToFacebook() {
driver = new FirefoxDriver();
driver.navigate().to("https://www.facebook.com/");
}
@When("^I enter Username as \"([^\"]*)\" and Password as \"([^\"]*)\"$")
public void I_enter_Username_as_and_Password_as(String arg1, String arg2) {
driver.findElement(By.id("email")).sendKeys(arg1);
driver.findElement(By.id("pass")).sendKeys(arg2);
driver.findElement(By.id("u_0_v")).click();
}
@Then("^login should be unsuccessful$")
public void validateRelogin() {
if(driver.getCurrentUrl().equalsIgnoreCase(
"https://www.facebook.com/login.php?login_attempt=1&lwv=110")){
System.out.println("Test Pass");
} else {
System.out.println("Test Failed");
}
driver.close();
}
}

Note − In the above code, we have to define a function having two input argument: one username and other will be for password. So for each set of input provided in the example tag, Set of GIVEN, WHEN and THEN will be executed.

Step 5 − Create a runner class file.

  • Select and right-click on the package outline.
  • Click on ‘New’ file.
  • Give the file name such as runTest.java
  • Write the following text within the file and save it.

package Outline;

import org.junit.runner.RunWith;
import cucumber.junit.Cucumber;

@RunWith(Cucumber.class)
@Cucumber.Options(format = {"pretty", "html:target/cucumber"})

public class runTest { }
  • Run the test using option −

    • Select runTest.java file from package explorer.
    • Right-click and select the option ‘Run as’.
    • Select JUnit test.

You will observe the following things when you run this class file

    • Facebook opens in a new Firefox web-browser instance.
    • Username1 and password1 will be passed as an input to username and password field.
    • Login will be clicked.
    • Message will be displayed on the browser regarding unsuccessful login.
    • In the console, you will see “Test Pass” printed.
    • Step result 1 to 5 will be re-executed for username2 and password2.

 Thank you


Venkata kishore T(Intern)
Shield Warriors,
Data Shield Team,
Enterprise Minds.


EM-Tirupati Codeathon Series #08

[Question] ROBOTIC CRICKET MATCH you should write a program that simulate an automatic cricket match between India and Sri Lanka. The fo...